Recently I had to set up a virtual machine (VM) that would mirror a VirtualBox VM pretty closely. I really didn't want to have to start over with a fresh machine set up so I decided to try to export the VirtualBox machine to our VMware host. After some trial and error I was able to get it to work.
The versions of software used is as follows:
- VirutualBox ~4.3
- vSphere Client ~5.1
- VMware ESXi ~5.1
Export the VM
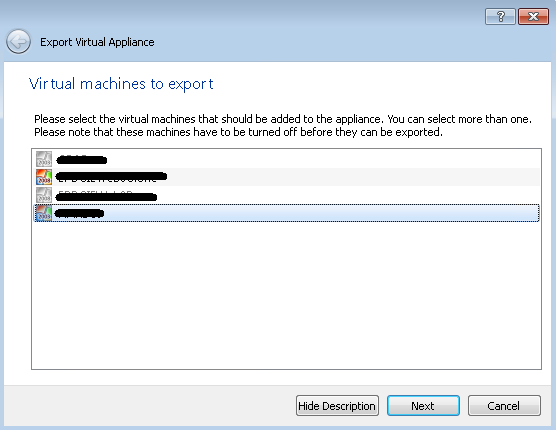
To begin you will need to export the VirtualBox machine. First shut down the machine and choose "File" > "Export Appliance". Next select the machine you wish to export and click "Next".
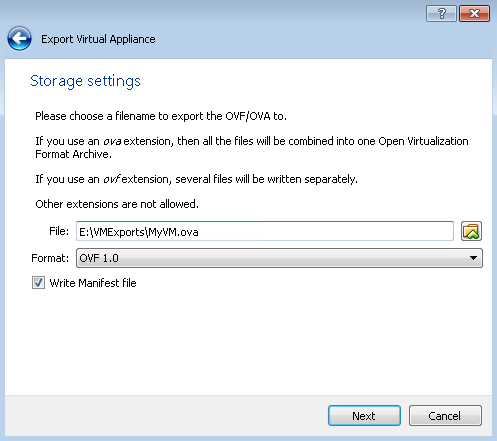
On the following screen, select a destination for the output file and choose the OVA format and choose "OVF 1.0" format from the drop down and check the write manifest file box.
Click "Next" and then click "Export". Depending on the size of the machine this could take a while.
Preparing to Import the VM
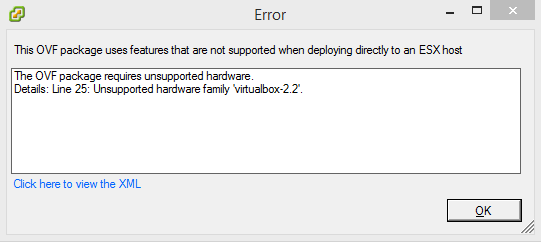
Once the export is complete you can try deploy the OVA to ESXi but you will receive the following error, "The OVF package requires unsupported hardware. Details: Line 25: Unsupported hardware family 'virtualbox-2.2'.".
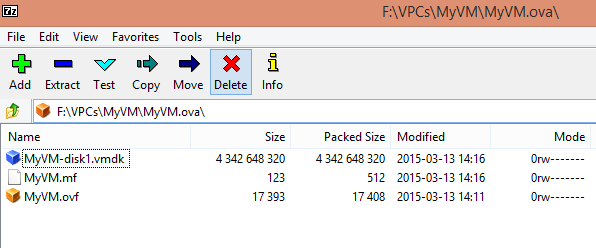
To fix this error, you will need to edit the OVF xml file in the OVA package. The OVA package wraps an OVF file, a mf checksum file and the actual vmdk or virtual machine disk. To extract the contents of this file, use 7Zip (right click > "7Zip" > "Open Archive") to extract the OVA contents. When you open the archive, you may receive a TAR error. You can just click "OK" to ignore it.
Make a backup copy of the OVF file and then open the OVF file with a text editor such as notepad++.
Change the following line:
<vssd:VirtualSystemType>virtualbox-2.2</vssd:VirtualSystemType>
to
<vssd:VirtualSystemType>vmx-07</vssd:VirtualSystemType>
After you have made this change, the checksum in the mf file will no longer match. To fix this error, you can just remove the line that references the OVF file. For reference, my file looked like this:
SHA1 (MyVM.ovf)= 15d2f22b24990179e414df556fe4a2e4697caee7
Import the VM
At this point you can try to attach the VM to your VMware box. Open the VMware vSphere client and connect to your host machine. Now choose file "Deploy OVF Template". Select the OVF file you just edited and click next. Make sure to select the OVF file, not the original OVA file.
At this point, you may receive a hardware error: "The OVF package requires unsupported hardware. Details: Line 74: OVF hardware element 'ResourceType' with instance ID '6'. No support for the virtual hardware device type '35'."

To fix this error, open the OVF file and remove the <item> element at the line # in question. In this case it was the sound card:
	<Item>
        <rasd:AddressOnParent>3</rasd:AddressOnParent>
        <rasd:AutomaticAllocation>false</rasd:AutomaticAllocation>
        <rasd:Caption>sound</rasd:Caption>
        <rasd:Description>Sound Card</rasd:Description>
        <rasd:ElementName>sound</rasd:ElementName>
        <rasd:InstanceID>6</rasd:InstanceID>
        <rasd:ResourceSubType>ensoniq1371</rasd:ResourceSubType>
        <rasd:ResourceType>35</rasd:ResourceType>
	</Item>
After you have made these adjustments to the OVF, try to load the file again. If you happened to leave the select OVF window open, you may not be able to select the OVF file from the browse or the drop down list selector. Just cancel and try again.
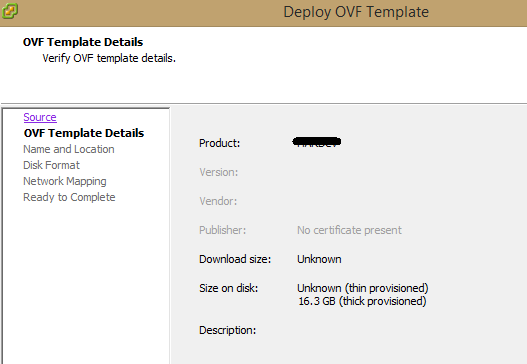
At this point you should get something like the following when you click next after selecting the modified OVF:
Now follow the prompts to finish importing your machine:
-
Click "Next" and enter (or verify) the name
-
Click "Next" and adjust Disk formatting if you wish
-
Click "Next" and verify the network
-
Click "Next" and click "Finish"
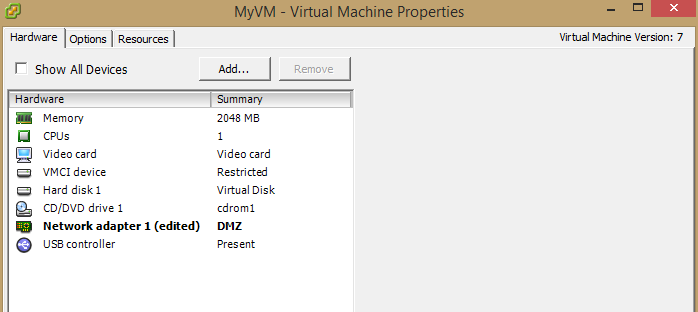
At this point, you will need to wait a few minutes for the VM to deploy. Once the machine has deployed, open the machine settings and make any adjustments you wish, such as memory or network adapter settings.
To complete your machine import, power on the machine and remove VirtualBox Guest Additions and install the VMware Guest Tools. Note: After the machine boots up and you log in, Windows will try to add hardware, click "Cancel" until you are installing the VMware Guest Tools.
First remove VirtualBox Guest Additions and restart. After the machine restarts, install the VMware Guest Tools. After the final restart you should have your VirtualBox machine running on VMware.
Closing Thoughts
I have been able to move quite a few VMs and physical machines to VMware after some adjustments. I hope this helps someone else in the future with their virtualization needs. Until next time - happy coding!