
Generally I have found that for the sake of speed, installing MongoDB on Windows isn't the best solution in production. However for development, this might be your only or best option. Having a local installed MongoDB is convenient and useful for quickly prototyping concepts.
Download MongoDB
To install MongoDB first download and run the installer from http://www.mongodb.org/downloads.
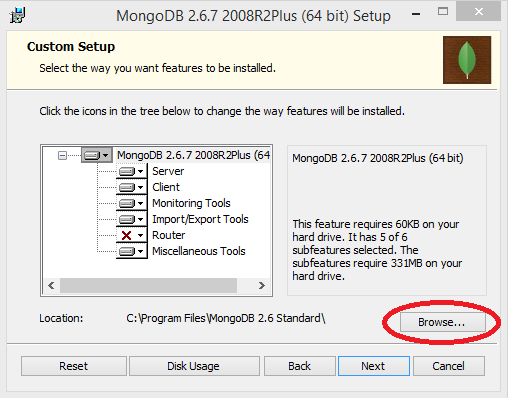
Run the installer and advance to the following screen and click "Custom":

Expand the tree and select all options except "Router". You will only need to install the MongoDB router for a distributed DB and chances are for development you will not need this option. If you think you might need this option, go ahead and install it. Before clicking "Next" - select the root item and click "Browse..." to choose a new directory on a root drive (such as C:/). I highly recommend this as it will make running command line tools much easier without having to use an administrator command prompt. I will be using E:/mongoDB for my install.
To finish the installation, click "Next" and "Install".
Testing the Install
Once the installer has finished, you should test the install. First you should create a data and log directory for the install. I will use E:/mongoDB/data and E:/mongoDB/logs for both.
Once you have created these directories, open a command prompt and direct it to your install directory - E:/mongoDB/bin. The bin directory is the root for all install MongoDB related programs and tools. Run the following command to start MongoDB:
E:\mongodb\bin\mongod --dbpath E:\mongodb\data
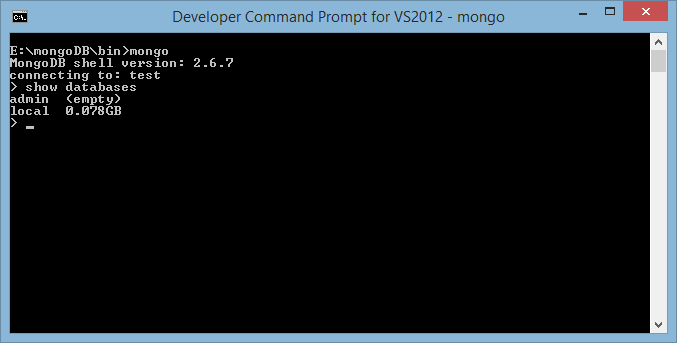
Leave this command prompt window running and start another command prompt and again direct it to your MongoDB directory. Run this command to connect to the MongoDB server:
E:\mongodb\bin\mongo
You should now see a prompt. Try running the command "show databases" to see if the server is running correctly.
To exit this connection, type exit. To end the server session, enter control+C.
Setting up the Configuration for MongoDB
Before setting up MongoDB to run as a service, you should take a minute to set up the default configuration for your install. Navigate to your install directory and create a mongod.cfg file. Add the following lines to this file:
Test your new db configuration via the following:
E:\mongodb\bin\mongod --config=E:\mongodb\mongod.cfg
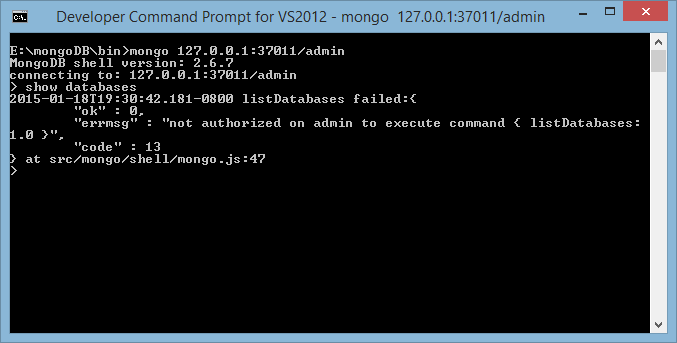
In another command prompt window connect to the service via the IP and port as follows:
E:\mongodb\bin\mongo 127.0.0.1:37011
Setting up MongoDB to Run as a Service
You can use the installed MongoDB application itself to set up MongoDB to run as a service, but I like to have a little more control over the service install. Use the following line to set up the service. NOTE: You will need to run this command from an administrator command prompt.
sc.exe create MongoDB binPath= "\"E:\mongoDB\bin\mongod.exe --service --config=E:\mongoDB\mongod.cfg\" DisplayName= "MongoDB" start= "auto"
Once the service is created, start the service from the Services control panel or use the following to start the service:
net start MongoDB
Again, using the command prompt above, connect to the service using the mongo executable on port 37011.
To delete the service, run the following from an administrator command prompt:
net stop MongoDB
sc delete MongoDB
Troubleshooting Service Install
If you followed the steps above and you receive an error message, make sure the line to add a service is entered exactly as above. The spacing and quotes are important for the service to be added correctly.
Securing Your MongoDB Install
Security is not enforced in the default install of MongoDB. If you want to enable security, follow the next steps. I like to enable security on my install so that my development environment will be closer to production.
First log into your install and create a DB admin user:
mongo 127.0.0.1:37011/admin
use admin
db.createUser(
  {
    user: "mongoadmin",
    pwd: "p@ssw0rd",
    roles:
    [
      {
        role: "userAdminAnyDatabase",
        db: "admin"
      }
    ]
  }
)
Once you have added the mongoadmin user, quit mongo and add the following to the mongod.cfg you created earlier.
auth=true
After adding the above to the cfg file, restart the MongoDB service. Now you will need to use the username and password to access the databases. If you try to connect to the MongoDB service without credentials and run the "show databases" command, you will see an error:
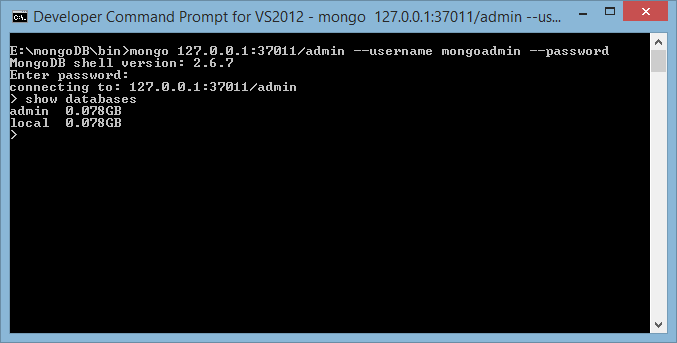
However using the following to connect, you will be able view the databases:
mongo 127.0.0.1:37011/admin --username mongoadmin --password
Creating a New Database
Now you finally have your MongoDB service up and running. The next step is to create a new database with a unique user. First log into the admin db with your admin user:
mongo 127.0.0.1:37011/admin --username mongoadmin --password
Next use the following commands to create a new database with the mongoadmin user and a database user:
use testDB1
db.createUser(
  {
    user: "mongoadmin",
    pwd: "p@ssw0rd",
    roles:
    [
      {
        role: "dbOwner",
        db: "testDB1"
      }
    ]
  }
)

db.createUser(
  {
    user: "mydbuser",
    pwd: "test1234",
    roles:
    [
      {
        role: "readWrite",
        db: "testDB1"
      }
    ]
  }
)
To test the created user, quit the current mongo shell and log back in using the new database user as follows:
mongo 127.0.0.1:37011/testDB1 --username mydbuser
Finally create a new collection and return the result
db.test.insert({"name":"test value"})
db.test.find()
Conclusion
Hopefully you found this guide helpful. The MongoDB install guide is actually quite detailed now and can be found at http://docs.mongodb.org/manual/tutorial/install-mongodb-on-windows/. Until next time - happy coding!