
Yes the title of this post is correct. A recent extension for Visual Studio 2013 will let you run Grunt inside of Visual Studio. Scott Hanselman gave a quick overview here, but honestly I had to stumble through implementing it the first time. To save you some time read on!
Preparing Your Environment
If you haven't done any work with NodeJS on your machine, you will need to do a few things to get your environment ready for this extension. This extension is a wrapper for NodeJS, Git, Bower, Grunt, Gulp and npm. If you haven't heard of or used any of these tools, I would recommend reading the following:
-
NodeJS - Everyone seems to be talking about it. It's a JavaScript based language that runs server-side. Grunt uses Node to run its tasks.
-
Git - Git is a version control system that is distributed. The Windows install is pretty unobtrusive. If you have never used Git, give it a shot. You may love it, I do now!
-
Bower - Bower installs client-side packages for the web, much like Nuget. Bower uses the Git repository for the client-side packages instead of the package having to be maintained by someone for Nuget.
-
Grunt - Grunt is a JavaScript task runner used to help with builds, downloading packages, minifying files, all sorts of fun things!
-
Gulp - Gulp is another JavaScript task runner, but is code-driven instead of declaration driven.
-
NPM - Node packaged modules manager. Think of NPM as something kind of like the Nuget of Node. NPM is more powerful though as it allows you to install modules you can you use system wide, not just in your project.
What to Install
Here is the install order I would use for a fresh install. As a guy who dabbles in Node, I had most of these installed. You don't need to re-install any item below. I would just make sure they are up-to-date. For all the installers, the default options will be fine.
A note about your Git install: if you choose to install and use the Git bash, like I do, you will need to add Git to your path. Follow the directions here to do that. If installed correctly, typing git in a command prompt will display the git help screen.
Once node is installed the following can be installed via NPM. NPM is installed with Node on Windows. Open a new command prompt and run the following commands.
npm install -g bower
The above command will install the bower package globally (-g) so any Node script can access the package on your machine. Now run the following 2 commands to finish all the installs we need.
npm install -g grunt-cli

npm install -g gulp
Once that batch of nitty gritty installs is done, you can finally install the extension for Visual Studio. You must install Visual Studio 2013 service pack 3 to install this package. If you haven't done that yet, check for updates in Visual Studio and install it. Once service pack 3 is installed, install the extension by downloading it here.
You will also need to install the following extensions to make your life a little easier:
- Package Intellisense Adds NPM and Bower package Intellisense right in Visual Studio.
- Grunt Launcher Adds a right click option for Grunt and Gulp files. Also allows you to do a right click, NPM install.
Using Grunt and Bower in Visual Studio
It's time for learning by example. To see why anyone would go through this much work to set up an extension, check out the following sample. First create a new empty web project. You can use Grunt and Bower in any web project, but for this example, keep it simple. If you want to cheat, you can check out the github for this example project here.
package.json
Once you have an empty web project, create the following package.json file. The package.json file is used by Grunt to provide information to Grunt about your project. These include the dev dependencies (what is needed to run your Grunt tasks) and the production (project) dependencies. The package below will tell NPM to install grunt and some grunt related packages that will be used in your grunt file.
{
    "name": "vs-grunt-example",
    "version": "0.0.1",
    "description": "Just a simple Grunt example - filled with fun and joy.",
    "devDependencies": {
        "grunt": "~0.4.5",
        "grunt-bower-task": "~0.4.0",
        "grunt-contrib-uglify": "~0.5.1",
        "grunt-contrib-concat": "~0.5.0"
    }
}
Once this package file is done, you will need to run NPM. Running NPM will install these packages and allow you to run your grunt script. I am in the habit of running NPM right after I make changes to my package.json script. To run NPM for your project, right click the package.json file and choose "NPM install packages".
bower.json
Now create a bower.json file. This file tells bower what you want your project to download and install in your project. More information about the bower.json file can be found here.
{
    "name": "vs-grunt-example",
    "version": "0.0.1",
    "authors": [
        "Randy Bacon <randy@hirerandybacon.com>"
    ],
    "description": "Example using grunt and bower in VS2013",
    "homepage": "www.hirerandybacon.com/blog",
    "dependencies": {
        "jquery": null,
        "leaflet": null,
        "leaflet-plugins": null
    },
    "exportsOverride": {
        "leaflet-plugins": {
            "control": "control/*.js",
            "css": "css/*",
            "layer": "layer/*.js",
            "layer/tile": "layer/tile/*.js",
            "layer/vector": "layer/vector/*.js"
        }
    },
    "private": true
}
Note: When I tried a fresh solution on another machine, bower could not read the bower.json file. It turned out the encoding was an issue. To fix it open the bower.json file, choose "Save As", click the arrow next to "Save", choose "Save with Encoding..." and finally select "Unicode (UTF-8 without signature)" for the encoding and "Unix (LF)" for the line endings.
Gruntfile.js
Now create the Gruntfile.js. This is where the magic happens. If you are still with me, then my virtual hat is off to you.
module.exports = function (grunt) {
    grunt.initConfig({
    	//this loads our packages for our grunt file
        pkg: grunt.file.readJSON('package.json'),

        //this section does our bower installs for us
        bower: {
            install: {
                options: {
                    targetDir: './scripts/vendor',
                    layout: 'byComponent',
                    install: true,
                    verbose: true,
                    cleanTargetDir: false,
                    cleanBowerDir: false,
                    bowerOptions: {}
                }
            }
        },

        //this section is used to join our js files together
        concat: {
            options: {
                separator: ';',
                stripBanners: true,
                banner: '/*! <%= pkg.name %> - v<%= pkg.version %> - ' +
                  '<%= grunt.template.today("mm-dd-yyyy") %> */',
            },
            devSrc: {
                src: ['scripts/vendor/jquery/*.js',
            'scripts/vendor/leaflet/*.js',
                    'scripts/vendor/leaflet-plugins/layer/tile/Google.js'],
                dest: 'scripts/vendor/dist/project-vendor-src.js',
            },
        },

        //this section is used to for our minify action
        uglify: {
            options: {
                banner: '/*! <%= pkg.name %> <%= grunt.template.today("yyyy-mm-dd") %> */\n'
            },
            build: {
                src: 'scripts/vendor/dist/project-vendor-src.js',
                dest: 'scripts/vendor/dist/project-vendor.min-<%= pkg.version %>.js'
            }
        }
    });

	//npm modules need for our task
    grunt.loadNpmTasks('grunt-bower-task');
    grunt.loadNpmTasks('grunt-contrib-uglify');
    grunt.loadNpmTasks('grunt-contrib-concat');

    //run bower for package install
    grunt.registerTask('install-bower-packages', ['bower']);

    //build vendor file src
    grunt.registerTask('merge-js-files', ['concat']);

    //build min vendor file from above
    grunt.registerTask('min-js-file', ['concat', 'uglify']);
};
Using Task Runner Explorer
Once your Gruntfile.js is complete, you can run the fancy Visual Studio Task Runner Explorer that this post is all about and watch the magic...
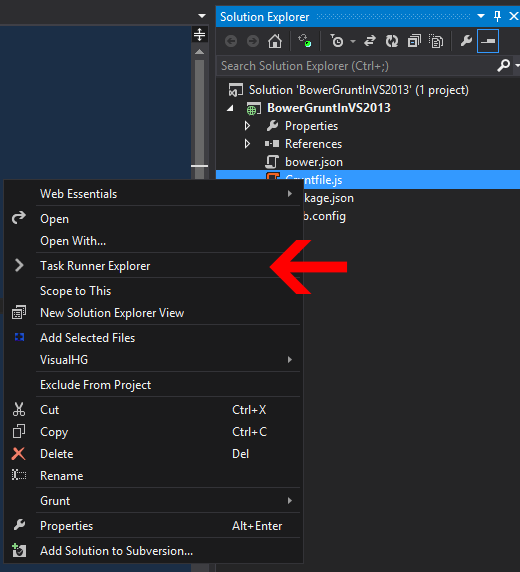
Right click on your Gruntfile.js file and choose Task Runner Explorer. This will open up the tool that allows you to run your Grunt tasks. Note: if this option isn't showing up for you, try to quit and restart Visual Studio. You should see something like the below:
Running Bower
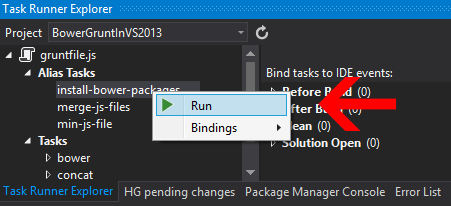
Right click the install-bower-packages Alias Task and click run.
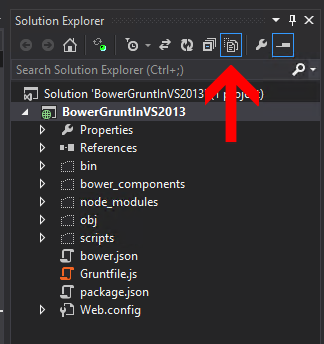
The right window should now let you know bower is doing some work. When this is done you probably will not see any changes in your Solution Explorer. You will need to show all files in the Solution Explorer via this button:
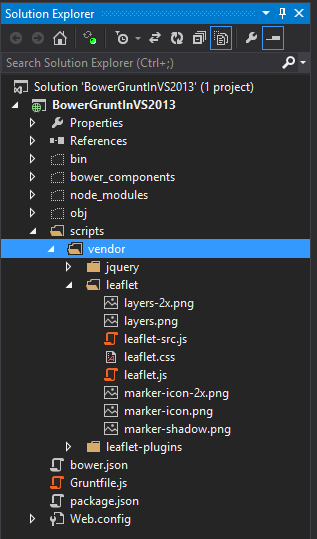
In order to see changes after running your grunt tasks, you will need to refresh your Solution Explorer. After refreshing, right click the scripts directory and select "Include in Project". Now your solution should now look something like this:
Congratulations! You have just used Grunt to download and install js files in your project via bower. Any time the Git repository changes, you can run this command to update the JS files you have referenced. This is a very easy way to keep your JS files in sync with the Git for new versions and bug fixes.
Joining Our JS Files
The second task you created will join your vendor JS files you just installed into a single JS file. This is helpful in dev (you only need to include a single file) and also makes creating a minified file of this file much faster.
Again go to the Task Runner Explorer and right click the merge-js-files Alias Task. Again you will see a few messages in your command window to the right. You can now refresh your scripts/vendor directory and you should see the dist directory. Make sure to refresh your Solution Explorer and include the files in your project to use them.
Minifying Our JS File
The final task you created will minify your JS file for use in production. Right click the min-js-file task and click run. Again refresh the scripts/vendor/dist and you should see your new project-vendor.min-0.0.1.js file. Sweet!
Gotchas
A few issues I ran into while working on my grunt scripts:
-
bower.json file encoding. Selecting the default .json template in Visual Studio will not work with bower and you will have to make adjustments to the encoding per above.
-
Pretty bad error messages. If you have an error in your package.json file, the command output is not really too helpful.
-
No bower search. From the command line you can run
bower search item-to-search-forto find matching gits. There doesn't appear to be a way to do that via this tool. -
Solution Explorer does not automatically add new files. As you probably experienced above, the Solution Explorer does not show your bower installed files automatically. This is a minor annoyance, but still a 'gotcha'.
-
NPM uninstalls - I was playing with different bower running packages and didn't like the first couple of packages I had installed. I was unable to delete them via Windows explorer because the path of some of the nested files was too long. To uninstall them, open a command prompt and browse to your web project directory. Run the following to remove a package:
npm uninstall <package name>
Closing Thoughts
Hopefully you can see the power of using bower and grunt in your project. It's a new world out there and Visual Studio is closing the gap between tools that are usually just used in Node or with Open Source tools. I find this change exciting and I'm very happy to be able to use bower inside of Visual Studio. Until next time - happy coding!